Flutter · 3D · flutter_scene
A practical Flutter-developer guide to understanding 3D models, GLB and glTF, preparing assets, working with Blender, loading models with flutter_scene, and avoiding common mobile-performance problems.
For: Flutter developers •
Package: flutter_scene 0.20.0 •
Blender knowledge: Not required
Start with the most important answer
If a client asks you to build a 3D product viewer in Flutter, your first requirement is usually not Dart code. You first need to identify where the actual 3D model will come from.
Simple mathematical shapes can be generated with code. Realistic branded products are normally created by a 3D artist, exported as a runtime asset, tested, optimized and then integrated into Flutter.
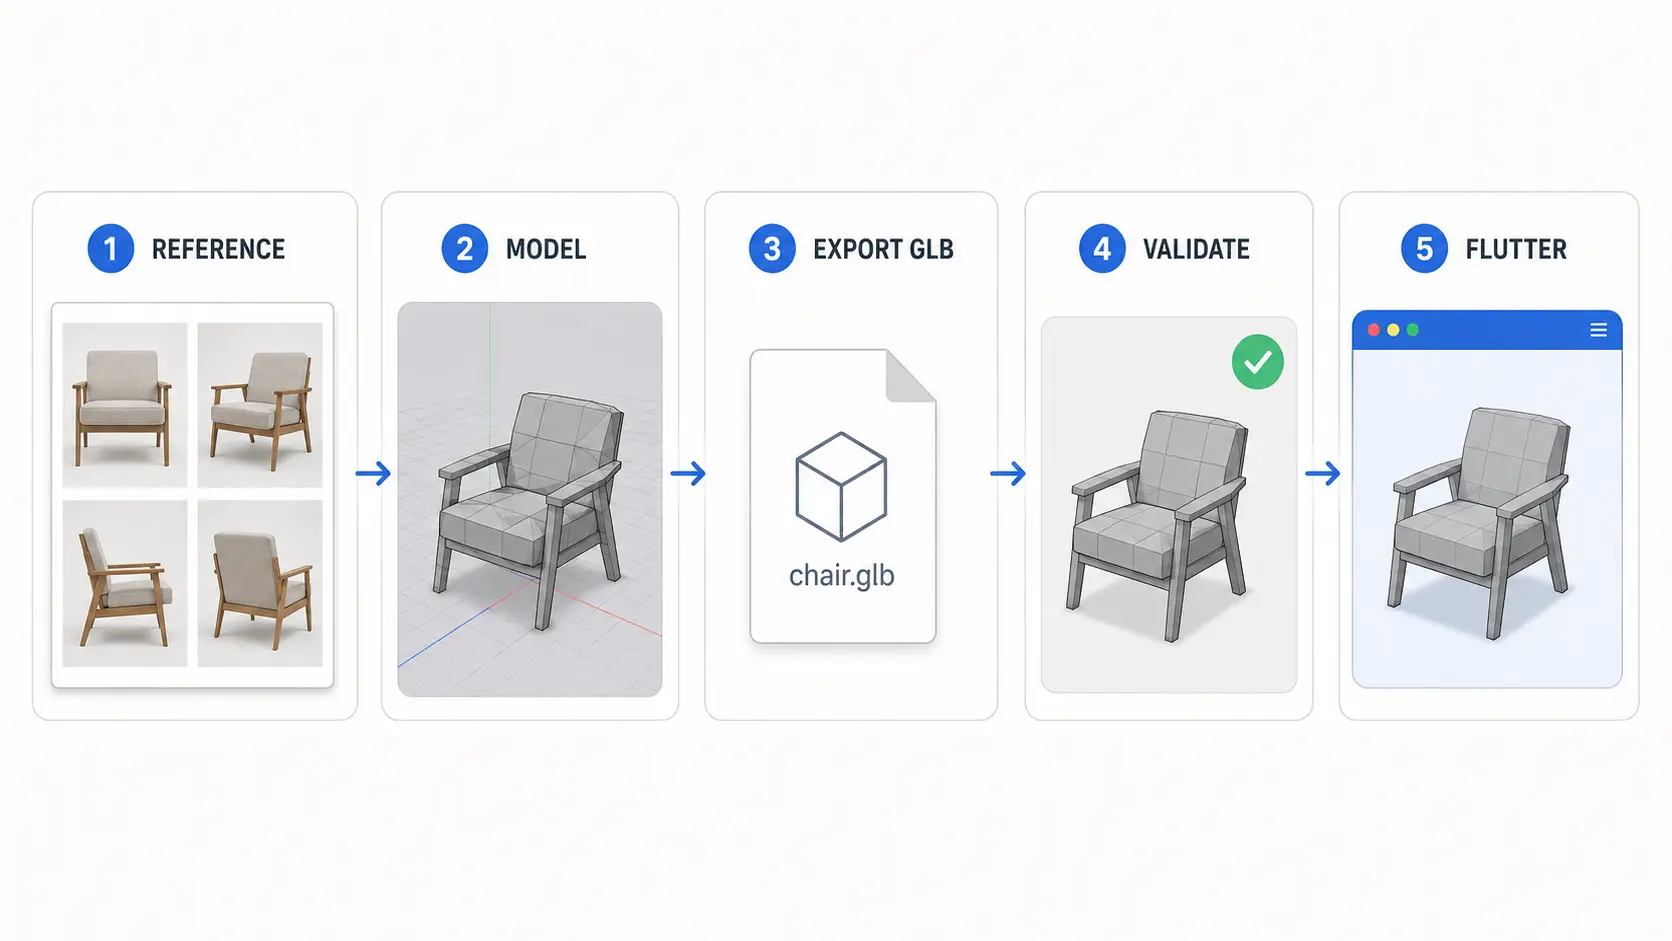
Think about it like an image asset. Flutter can draw basic shapes, but a realistic product photograph must still be supplied or created. A 3D asset also contains geometry, materials, textures, hierarchy and sometimes animation.
The minimum 3D mental model
You do not need to become a professional 3D artist, but you should understand the main parts that make a scene render correctly.
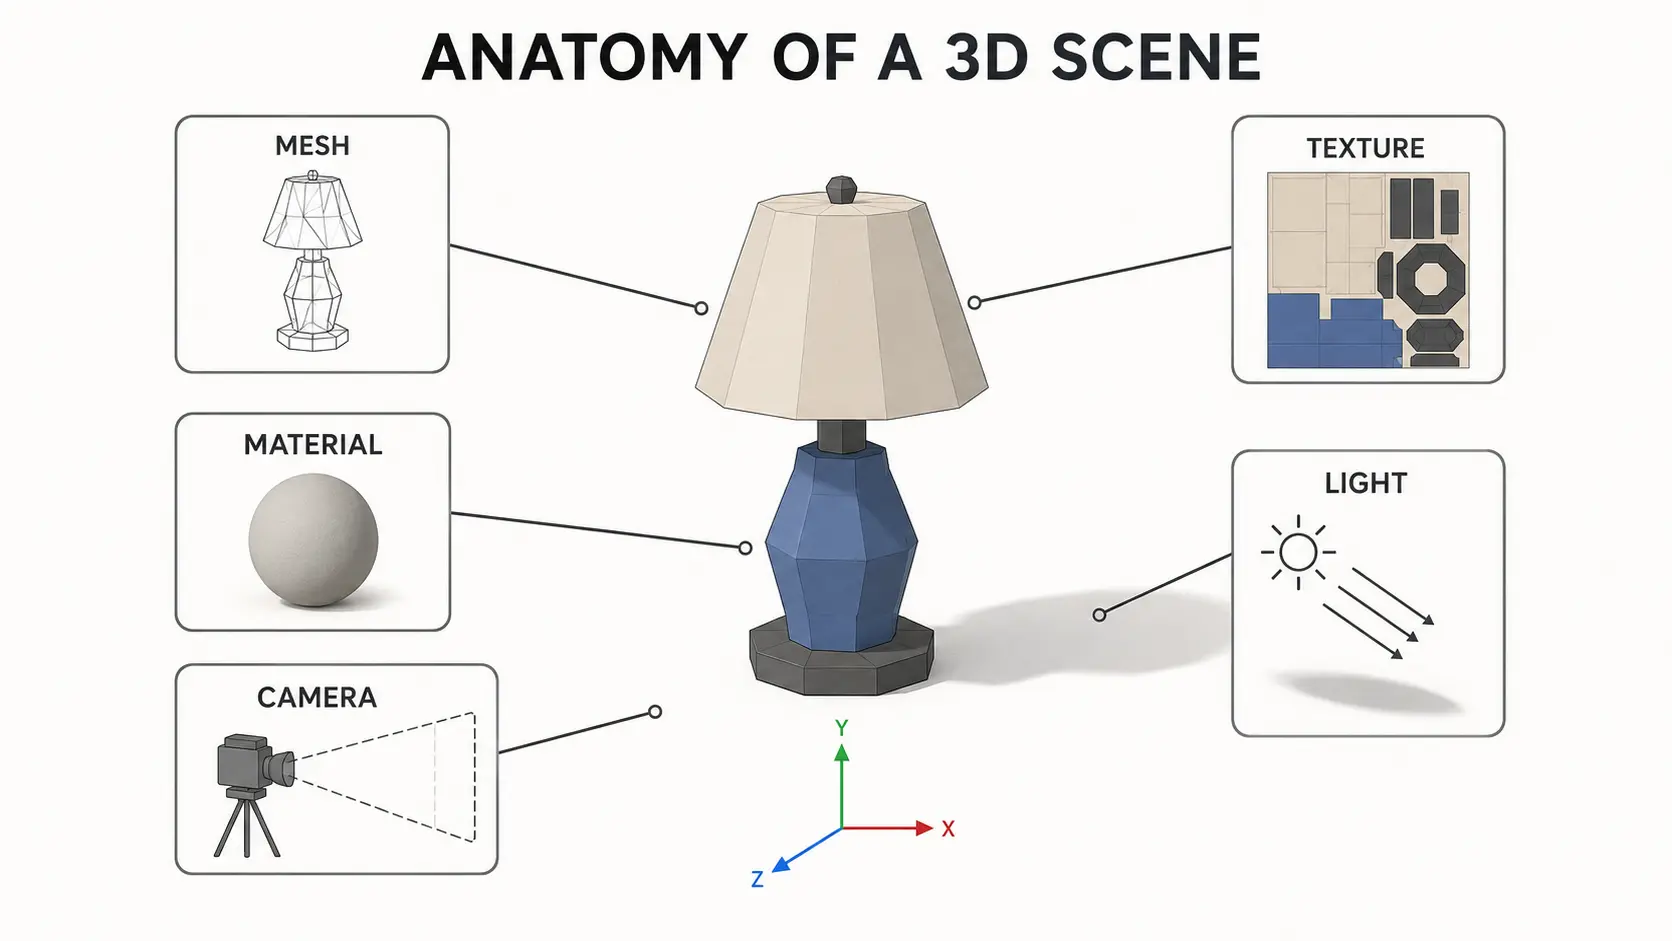
Can a 3D model be created only with Dart code?
Can I create cubes, spheres and procedural objects?
Yes. Simple mathematical geometry works well for charts, planets, grids, terrain, particles, technical visualizations and debugging shapes.
Can I create a realistic branded shoe entirely in Dart?
It is technically possible to generate complex geometry, but it is not a practical production workflow. Detailed products are normally modeled using Blender, Maya, Cinema 4D, CAD software or a licensed scan.
What should Flutter code control?
Flutter should handle loading, application state, camera movement, gestures, product variants, animation playback, hotspots, visibility, API data and the surrounding interface.
Suitable for code generation
Basic shapes, data visualizations, grids, particles, procedural objects, mathematical surfaces and debugging geometry.
Usually requires an external asset
Shoes, cars, furniture, people, buildings, branded products and detailed machinery.
GLB and glTF explained
glTF is a runtime-friendly format for delivering 3D scenes and models. GLB is its convenient binary container form.
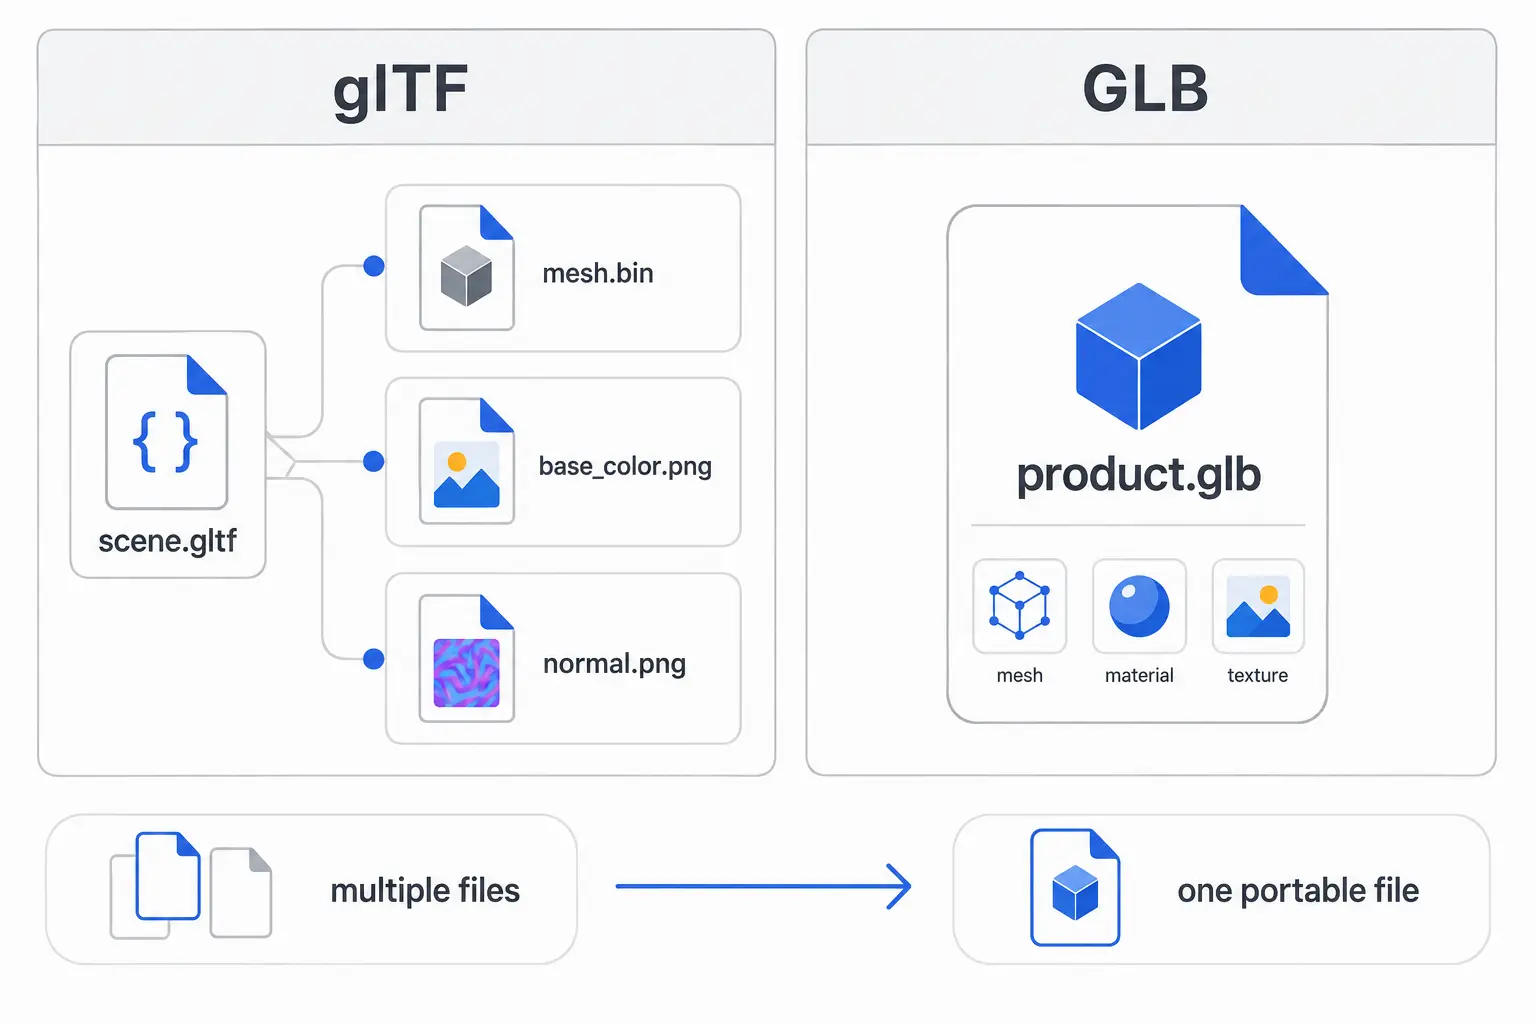
glTF
Usually contains a JSON scene description that can reference separate binary mesh data and texture images.
product/
├── product.gltf
├── product.bin
├── base_color.png
├── normal.png
└── roughness.png
GLB
A binary container that commonly packages scene information, geometry and textures into one easier-to-manage file.
assets/
└── product.glbGLB does not automatically mean optimized. It can still contain excessive geometry, very large textures, unnecessary animation or expensive materials.
Who is responsible for what?
| Work | Usually responsible | Flutter developer? |
|---|---|---|
| Create geometry | 3D artist or CAD designer | Normally no |
| UV mapping and textures | 3D or texture artist | Normally no |
| Animation clips | 3D animator | Normally no |
| Export GLB | Artist or developer | Can do |
| Optimize for mobile | Shared responsibility | Must validate |
| Load and render model | Flutter developer | Yes |
| Camera, UI and gestures | Flutter developer | Yes |
Do not treat “create a realistic 3D asset” and “integrate a supplied GLB into Flutter” as the same development task.
Client handoff checklist
Ask these questions before providing the final estimate:
- Do you already have a 3D model?
- Which format is available: GLB, glTF, FBX, OBJ, USDZ, CAD or Blender?
- Can you provide both the source file and runtime export?
- Is the asset licensed for use in the application?
- Are textures and materials included?
- Does the model contain animations?
- Should users select or interact with individual parts?
- Must users change colors or material variants?
- Is augmented reality required?
- Which platforms and minimum devices must be supported?
Where can the 3D asset come from?
Client-supplied asset
Best for branded products. Request the source file, runtime export, textures, license and animation information.
Created by a 3D artist
Suitable when the product must match real references and no usable model currently exists.
Licensed marketplace model
Useful for prototypes and generic objects. Verify commercial-use and redistribution terms.
Photogrammetry or scanning
Useful for recreating real objects, but scanned assets normally require cleanup and mobile optimization.
Where Blender fits
A Flutter developer does not need to master Blender. However, basic inspection and export skills can solve many common integration problems.
- 01 — Inspect the source model
Check scale, position, hierarchy, materials and animations. - 02 — Fix origin and transforms
Prevent the model from appearing tiny, enormous, rotated or off-camera. - 03 — Check materials and textures
Confirm that required textures are connected correctly. - 04 — Reduce unnecessary complexity
Remove hidden geometry and excessive polygon or texture cost. - 05 — Export as GLB
Include only the assets and animations required by the app. - 06 — Validate independently
Open the GLB in another viewer before debugging Flutter code.
What flutter_scene provides
Rendering
PBR materials, lights, shadows, reflections, environment lighting and visual effects.
Asset loading
Runtime GLB loading, textures, scene hierarchy, animations and material variants.
Interaction
Cameras, scene input, pointer interaction, raycasting and Flutter widget integration.
Advanced features
Procedural geometry, particles, physics integrations and engine-level capabilities.
Setup from zero
1. Create the project
flutter create flutter_3d_demo
cd flutter_3d_demo
2. Add dependencies
dependencies:
  flutter:
    sdk: flutter

  flutter_scene: ^0.20.0
  vector_math: any
3. Add your GLB
flutter_3d_demo/
├── assets/
│   └── model.glb
├── lib/
│   └── main.dart
└── pubspec.yaml
4. Register the asset
flutter:
  uses-material-design: true

  assets:
    - assets/model.glb
5. Install packages
flutter pub getFirst working flutter_scene demo
This example creates a scene, loads a bundled GLB and renders it through a perspective camera.
import 'package:flutter/material.dart';
import 'package:flutter_scene/scene.dart';
import 'package:vector_math/vector_math.dart' as vm;

class ModelView extends StatefulWidget {
  const ModelView({super.key});

  @override
  State<ModelView> createState() => _ModelViewState();
}

class _ModelViewState extends State<ModelView> {
  final Scene scene = Scene();
  bool isReady = false;
  Object? loadError;

  @override
  void initState() {
    super.initState();
    loadModel();
  }

  Future<void> loadModel() async {
    try {
      await Scene.initializeStaticResources();

      final model = await Node.fromGlbAsset(
        'assets/model.glb',
      );

      scene.add(model);

      if (!mounted) return;
      setState(() => isReady = true);
    } catch (error) {
      if (!mounted) return;
      setState(() => loadError = error);
    }
  }

  @override
  Widget build(BuildContext context) {
    if (loadError != null) {
      return Center(
        child: Text('Failed to load model:\n$loadError'),
      );
    }

    if (!isReady) {
      return const Center(
        child: CircularProgressIndicator(),
      );
    }

    return SceneView(
      scene,
      camera: PerspectiveCamera(
        position: vm.Vector3(0, 2, 5),
        target: vm.Vector3(0, 0, 0),
      ),
    );
  }
}Build something useful
A product configurator is a better learning project than a model that only rotates.
- 01 — Load one product
Begin with one optimized model and no physics. - 02 — Frame the camera
Make the product fill the intended viewport correctly. - 03 — Add camera motion
Allow users to inspect the product from useful angles. - 04 — Add product variants
Connect color or material selection to Flutter state. - 05 — Keep controls as widgets
Use normal Flutter widgets for colors, size, price and cart actions. - 06 — Test a real device
Measure performance before increasing visual quality.
Mobile 3D performance checklist
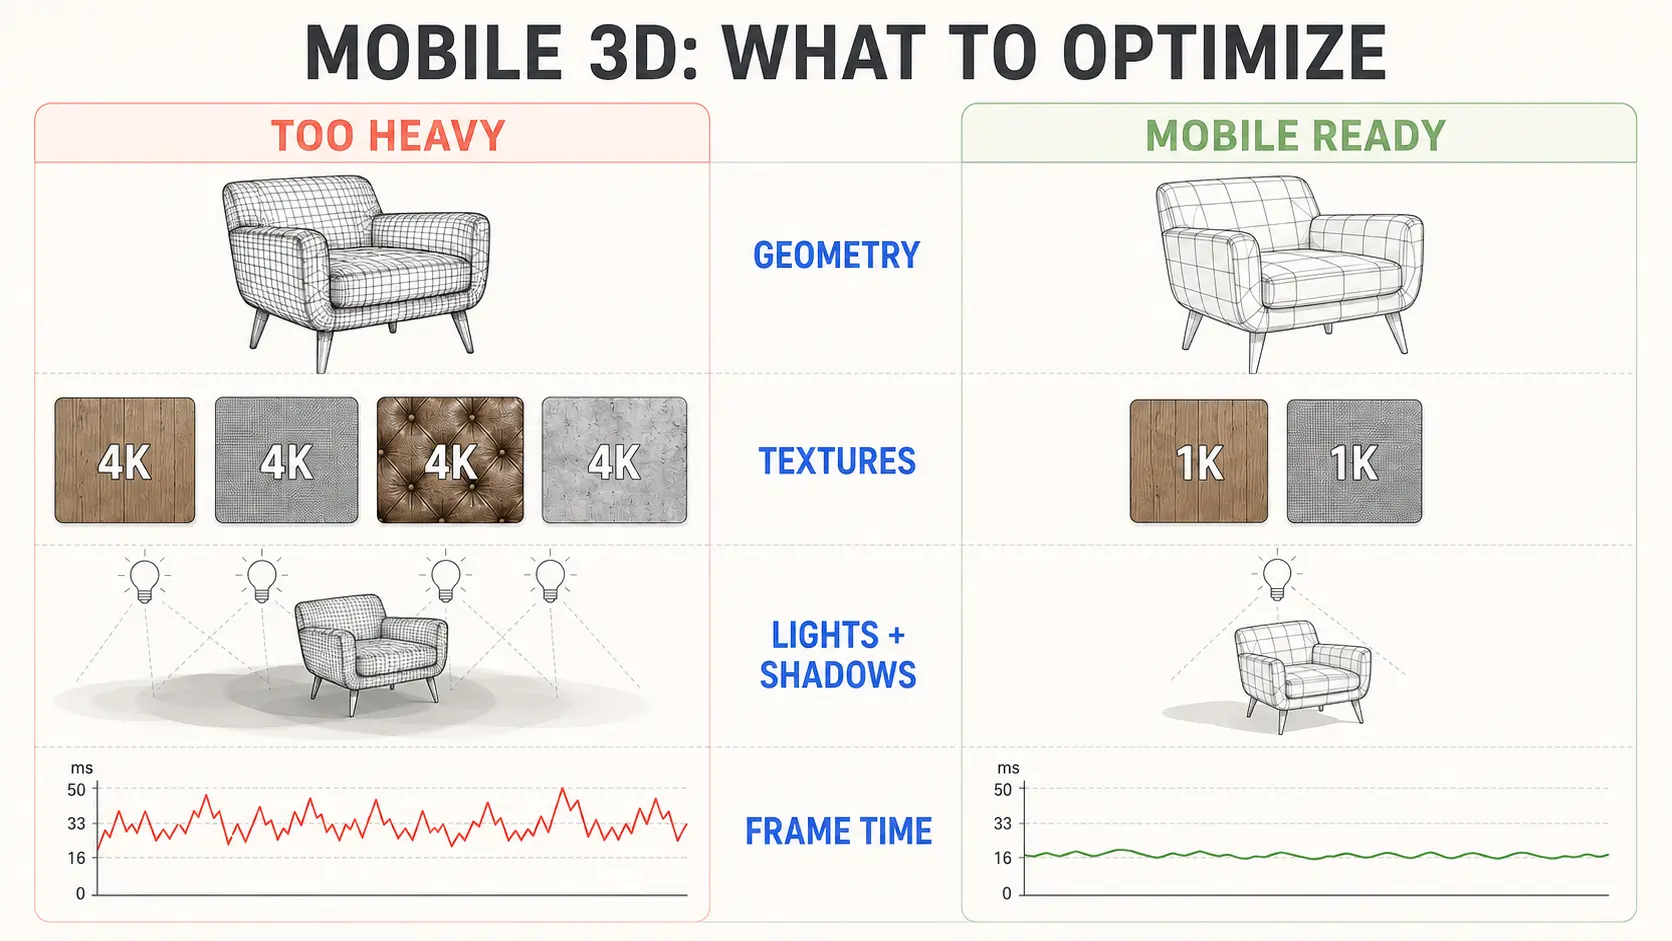
- Geometry: remove hidden parts and unnecessary subdivisions.
- Textures: avoid 4K or 8K textures when smaller versions look identical on mobile.
- Materials: reduce unnecessary material slots and transparent surfaces.
- Lighting: minimize real-time lights and expensive shadows.
- Loading: avoid repeating expensive asset work during rebuilds.
- Testing: measure loading time, memory and frame rate on real devices.
Choose the solution based on the requirement
| Requirement | Direction |
|---|---|
| Advanced real-time 3D | Evaluate flutter_scene |
| Basic model preview | Consider a lighter viewer |
| Full game and complex physics | Consider a game engine |
| AR product placement | Evaluate AR separately |
| Pre-rendered animation only | Consider video or image sequence |
Common questions and answers
Why is my model black?
The scene may have no usable lighting, the material may be incorrect or textures may be missing.
Why can’t I see the model?
Check the asset path, camera target, model position, scale and origin.
Why is loading slow?
Common causes are large files, excessive geometry, oversized textures and complex animations.
Can users change product colors?
Yes, when the asset contains clearly separated materials or prepared material variants.
Can one model work on all platforms?
Possibly, but every platform must be tested because renderer behavior and hardware performance can differ.
Useful learning resources
flutter_scene documentation
Review setup requirements, examples, supported platforms and migration notes.
Khronos glTF documentation
Understand the format, extensions and runtime asset structure.
Blender fundamentals
Learn transforms, origin placement, material inspection, optimization and GLB export.
Independent GLB viewer
Validate every model outside Flutter before debugging application code.
Recommended learning order
- Understand scene, mesh, material, texture, light and camera.
- Use one small licensed GLB.
- Validate it in an independent viewer.
- Load it in a minimal Flutter project.
- Correct camera position, scale and lighting.
- Add gestures and useful Flutter UI.
- Add product variants or animation.
- Profile it on a real device.
Final takeaway
A successful Flutter 3D feature depends on three things working together: a properly prepared asset, a capable renderer and well-structured Flutter application logic.