
PhonePe Payment Integration for Subscription-Based Services
System Flow
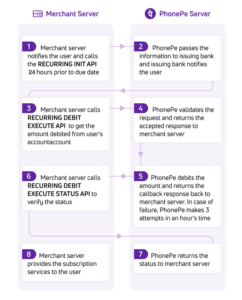
The integration supports subscription-based transactions, allowing users to pay for products or services offered by merchants at regular intervals. The process includes two key stages: setting up the mandate and handling recurring payments.
Supported Platforms for Autopay
- PhonePe: Android and iOS
- BHIM UPI: Only Android
- Paytm: Android and iOS
- GPay: Only iOS
___________________________________________________________________________________________________________________________________________________________________
Recurring Payments Overview
- Setting up the Mandate
- Recurring Payments
___________________________________________________________________________________________________________________________________________________________________
1. Mandate Set-Up Flow
This step involves creating a mandate that allows the user to authorize recurring payments. The mandate can be created with or without an initial payment.
Step-by-Step Process:
Step 1: Create User Subscription
- The merchant calls the Create User Subscription API to generate a subscription ID for each subscription request.
- Based on the use case, there are two types of mandates:
- Mandates with First-Time Payments: The user is charged immediately.
- Mandates without First-Time Payment: The user provides consent for future payments and is charged ₹1 for mandate completion. The amountType parameter should be set to Variable.
Step 2: Check Subscription Status
- The merchant calls the User Subscription Status API to verify the status of the subscription.
Step 3: Submit AUTH Request
- The merchant calls the Submit AUTH Request API, passing the subscription ID as input to initiate the mandate.
Step 4: Redirect User
- The merchant redirects the user to the intent/redirection URL received in the response of the Submit AUTH Request API.
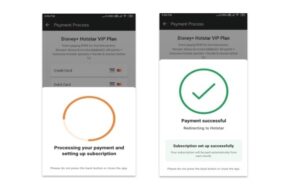
- The user sets up the mandate by completing the payment.
Step 5: Confirm AUTH Request
- The merchant calls the AUTH Request Status API to confirm the status and display the subscription status to the user.
Step 6: Manage Subscription
- The merchant can call the Cancel API to manage the subscription at any time during its cycle.

___________________________________________________________________________________________________________________________________________________________________
2. Recurring Payments Flow
This step involves charging the user at predefined intervals based on the subscription terms.
Step-by-Step Process:
Step 1: Initiate Recurring Payment
- The merchant calls the Recurring INIT API 24 hours before the due date. PhonePe notifies the issuing bank, prompting them to notify the user of the recurring payment.
- The merchant sends a separate notification to the user via email, SMS, or in-app push notifications.
- Based on the use case:
- If autoDebit is set to true, PhonePe will automatically deduct the amount without further calls.
- If autoDebit is set to false, the merchant must call the Recurring Debit Execute API to initiate the deduction.
Step 2: Debit Execution
- PhonePe processes the payment either automatically (if autoDebit=true) or upon receiving the Recurring Debit Execute API call.
Step 3: Confirm Debit Status
- PhonePe sends an S2S callback to the merchant once the payment is processed.
- Alternatively, the merchant can call the Debit Execute Request Status API to check the status of the recurring payment.
___________________________________________________________________________________________________________________________________________________________________
UI Flow
UAT Sandbox Overview
The UAT Sandbox is a testing environment designed to simulate the entire payment flow for online merchants. It allows merchants to mock different payment scenarios, such as Success, Failure, and Pending, using templates that map APIs to mock responses.
Benefits of Using the UAT Sandbox
- Reliability: Even if the PhonePe UAT server experiences downtime, the UAT Sandbox ensures a seamless testing experience, allowing merchants to continue simulating end-to-end payment flows without interruptions.
___________________________________________________________________________________________________________________________________________________________________
Sequence for Autopay – UPI Integration
Steps to Set Up and Verify Payment Methods on the Custom Checkout Page:
- Update the Host URL for UAT Sandbox
- Android/iOS Test App Setup
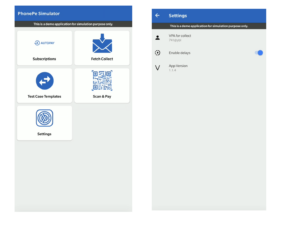
- Android: Download the PhonePe Test App [Package Name: com.phonepe.simulator].
- iOS: Share your email ID with the PhonePe Integration Team to receive an invite via Firebase.
- Test App Setup
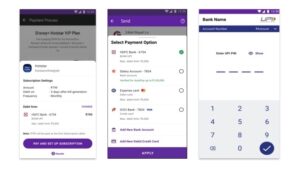
- Navigate to Settings and configure the VPA for Collect, such as @ybl, for testing the UPI Collect flow.
- Once the collect request is raised, go to the PhonePe Test App, click Fetch Collect, and then click Pay to complete the transaction.
- Access Test Case Templates to configure templates for Success, Failure, or Pending responses.
- By default, the Success template is selected, meaning you will receive a success response.
- Subscription Management
- After setting up the subscription using the UPI Intent or Collect flow, subscriptions can be viewed by clicking the Subscriptions button.
- For each subscription, you will have options to Pause, UnPause, or Revoke the subscription.
- Callback Configuration
- Share the Callback/Webhook URL with the PhonePe Integration Team to set up a static callback URL for managing the Pause/UnPause/Revoke features.
UAT to Production Migration
UAT Sign-Off Process
Once the integration is complete, you need to send the test app to PhonePe for a sanity check. After the successful UAT sign-off, PhonePe will provide the production credentials.
Steps to Go LIVE with Production:
Before transitioning from UAT to production, ensure the following parameters are updated in your system:
| Parameter | Steps |
|---|---|
| MerchantID | Use the MerchantID shared by PhonePe for production. |
| Host URL | Replace the UAT host URL in the Server API calls with: |
| https://mercury-t2.phonepe.com | |
| API Keys | Replace the UAT API keys with the Production Keys for checksum and X-VERIFY header computation in all API calls. |
| PhonePe Package Name | Use the production package name: com.phonepe.app |
Here is the documentation for the PhonePe API class you created:
___________________________________________________________________________________________________________________________________________________________________
PhonePe API Integration
Base URL
All API requests are sent to the sandbox environment base URL:
https://api-preprod.phonepe.com/apis/pg-sandbox
Endpoints
Below is the list of API endpoints with their descriptions, payloads, and expected responses.
___________________________________________________________________________________________________________________________________________________________________
General Notes on Request Construction
- Payload Preparation:
- The request payload must first be serialized into a JSON string.
- The serialized JSON string is then encoded into Base64 format.
- Headers:
- The X-Verify header is required to ensure secure communication. It is calculated using:
- The Base64-encoded payload (payload_base64).
- The API path (path).
- The salt key (SALT_KEY), which is specific to your integration.
- A hash is generated using the SHA-256 algorithm in the format:
SHA256(payload_base64 + path + salt_key) + “###” + salt_index - Mandatory Headers:
- Content-Type: Always set to application/json.
- X-Verify: The computed hash value for the request.
- X-CALLBACK-URL: (Optional) Callback URL for certain API endpoints.
- The X-Verify header is required to ensure secure communication. It is calculated using:
- Response:
- All responses from the PhonePe API are in JSON format, with a code field indicating the status of the request.
1. Create Subscription
- Endpoint: /v3/recurring/subscription/create
- HTTP Method: POST
- Description: Creates a subscription for the user.
Payload:
{
“merchantId”: “<MERCHANT_ID>”,
“merchantUserId”: “<USER_ID>”,
“subscriptionName”: “<SUBSCRIPTION_NAME>”,
“amount”: “<AMOUNT_IN_PAISA>”,
“currency”: “INR”,
“frequency”: “<FREQUENCY>”,
“duration”: “<DURATION>”,
“callbackUrl”: “<CALLBACK_URL>”
}
Response Example:
{
“code”: “SUCCESS”,
“message”: “Subscription created successfully”,
“data”: {
“subscriptionId”: “<SUBSCRIPTION_ID>”
}
___________________________________________________________________________________________________________________________________________________________________
2. Get Subscription Status
- Endpoint: /v3/recurring/subscription/status/{merchantId}/{merchantSubscriptionId}
- HTTP Method: GET
- Description: Retrieves the status of a specific subscription.
Response Example:
{
“code”: “SUCCESS”,
“message”: “Subscription details fetched successfully”,
“data”: {
“status”: “ACTIVE”,
“subscriptionId”: “<SUBSCRIPTION_ID>”,
“nextDebitDate”: “<NEXT_DEBIT_DATE>”
}
}
___________________________________________________________________________________________________________________________________________________________________
3. Get All Subscriptions
- Endpoint: /v3/recurring/subscription/user/{merchantId}/{merchantUserId}/all
- HTTP Method: GET
- Description: Retrieves all subscriptions associated with a user.
Response Example:
{
“code”: “SUCCESS”,
“message”: “Subscriptions fetched successfully”,
“data”: [
{
“subscriptionId”: “<SUBSCRIPTION_ID>”,
“status”: “ACTIVE”
}
___________________________________________________________________________________________________________________________________________________________________
4. UPI Intent Subscription Authorization
- Endpoint: /v3/recurring/auth/init
- HTTP Method: POST
- Description: Initiates a UPI intent authorization request for a subscription.
Payload:
{
“merchantId”: “<MERCHANT_ID>”,
“merchantUserId”: “<USER_ID>”,
“subscriptionId”: “<SUBSCRIPTION_ID>”,
“authRequestId”: “<AUTH_REQUEST_ID>”,
“amount”: “<AMOUNT_IN_PAISA>”,
“paymentInstrument”: {
“type”: “UPI_INTENT”,
“targetApp”: “com.phonepe.app”
},
“deviceContext”: {
“deviceOS”: “ANDROID”
}
}
Response Example:
{
“code”: “SUCCESS”,
“message”: “Authorization request sent”,
“data”: {
“status”: “PENDING”
}
}
___________________________________________________________________________________________________________________________________________________________________
5. Recurring Debit Initiation
- Endpoint: /v3/recurring/debit/init
- HTTP Method: POST
- Description: Initiates a recurring debit for an active subscription.
Payload:
{
“merchantId”: “<MERCHANT_ID>”,
“merchantUserId”: “<USER_ID>”,
“subscriptionId”: “<SUBSCRIPTION_ID>”,
“transactionId”: “<TRANSACTION_ID>”,
“amount”: “<AMOUNT_IN_PAISA>”,
“autoDebit”: true
}
Response Example:
{
“code”: “SUCCESS”,
“message”: “Recurring debit initiated”,
“data”: {
“transactionStatus”: “SUCCESS”
}
}
___________________________________________________________________________________________________________________________________________________________________
6. Cancel Subscription
- Endpoint: /v3/recurring/subscription/cancel
- HTTP Method: POST
- Description: Cancels an existing subscription.
Payload:
{
“merchantId”: “<MERCHANT_ID>”,
“merchantUserId”: “<USER_ID>”,
“subscriptionId”: “<SUBSCRIPTION_ID>”
}
Response Example:
{
“code”: “SUCCESS”,
“message”: “Subscription canceled successfully”
}
___________________________________________________________________________________________________________________________________________________________________
7. Refund
- Endpoint: /v4/credit/backToSource
- HTTP Method: POST
- Description: Issues a refund for a transaction.
Payload:
{
“merchantId”: “<MERCHANT_ID>”,
“transactionId”: “<NEW_TRANSACTION_ID>”,
“originalTransactionId”: “<ORIGINAL_TRANSACTION_ID>”,
“amount”: “<AMOUNT_IN_PAISA>”,
“merchantOrderId”: “<ORDER_ID>”,
“message”: “Refund initiated”
}
Response Example:
{
“code”: “SUCCESS”,
“message”: “Refund successful”,
“data”: {
“refundStatus”: “SUCCESS”
}
}
___________________________________________________________________________________________________________________________________________________________________
PAY API
PhonePe Python SDK Integration Documentation
This document provides a step-by-step guide to integrate PhonePe APIs using the Python SDK, including installation, setup, and usage for various functionalities like payment initiation, status checking and refunds.
Documentation :- URL
___________________________________________________________________________________________________________________________________________________________________
1. Installation
- Prerequisite: Python 3.9 or later.
Run the following command to install the PhonePe SDK:
pip install –index-url https://phonepe.mycloudrepo.io/public/repositories/phonepe-pg-sdk-python –extra-index-url https://pypi.org/simple phonepe_sdk==1.1.0
___________________________________________________________________________________________________________________________________________________________________
2. Setup
Creating the PhonePe Client
from phonepe.sdk.pg.payments.v1.payment_client import PhonePePaymentClient
from phonepe.sdk.pg.env import Env
merchant_id = “YOUR_MERCHANT_ID”
salt_key = “YOUR_SALT_KEY”
salt_index = 1
env = Env.UAT # Change to Env.PROD when you go live
phonepe_client = PhonePePaymentClient(
merchant_id=merchant_id, salt_key=salt_key, salt_index=salt_index, env=env
)
___________________________________________________________________________________________________________________________________________________________________
3. Payment Flow
Initiating a Transaction Using Pay Pageimport uuid
from phonepe.sdk.pg.payments.v1.models.request.pg_pay_request import PgPayRequest
unique_transaction_id = str(uuid.uuid4())[:-2]
ui_redirect_url = “https://www.merchant.com/redirectPage”
s2s_callback_url = “https://www.merchant.com/callback”
amount = 1000 # Transaction amount in paise
id_assigned_to_user_by_merchant = “USER_ID”
pay_page_request = PgPayRequest.pay_page_pay_request_builder(
merchant_transaction_id=unique_transaction_id,
amount=amount,
merchant_user_id=id_assigned_to_user_by_merchant,
callback_url=s2s_callback_url,
redirect_url=ui_redirect_url,
)
pay_page_response = phonepe_client.pay(pay_page_request)
pay_page_url = pay_page_response.data.instrument_response.redirect_info.url
print(“Pay Page URL:”, pay_page_url)
- Output:
Redirect the user to the pay_page_url for completing the payment.
___________________________________________________________________________________________________________________________________________________________________
4. Checking Transaction Status
unique_transaction_id = “INSERT_YOUR_UNIQUE_TRANSACTION_ID”
transaction_status_response = phonepe_client.check_status(
merchant_transaction_id=unique_transaction_id
)
transaction_state = transaction_status_response.data.state
print(“Transaction State:”, transaction_state)
- Output:
Transaction status can be one of the following:- SUCCESS
- FAILED
- PENDING
___________________________________________________________________________________________________________________________________________________________________
5. Callback Verification
Verify the callback response received from PhonePe to ensure authenticity.
x_verify_header_data = “a005532637c6a6e4a4b08ebc6f1144384353305a9cd253d995067964427cd0bb###1”
phonepe_s2s_callback_response_body_string = ‘{“response”: “…”}’
is_valid = phonepe_client.verify_response(
x_verify=x_verify_header_data,
response=phonepe_s2s_callback_response_body_string
)
print(“Is callback valid:”, is_valid)
- Output:
If the output is True, the callback is valid.
___________________________________________________________________________________________________________________________________________________________________
6. Refund a Transaction
Refund an already processed transaction.
unique_transcation_id = str(uuid.uuid4())[:-2]
original_transaction_id = “TRANSACTION_ID_TO_REFUND”
refund_amount = 100 # Refund amount in paise
refund_response = phonepe_client.refund(
merchant_transaction_id=unique_transcation_id,
original_transaction_id=original_transaction_id,
amount=refund_amount,
callback_url=”https://www.merchant.com/refund-callback”,
)
response_code = refund_response.data.response_code
print(“Refund Response Code:”, response_code)
- Output:
The refund response includes the status of the refund process.
___________________________________________________________________________________________________________________________________________________________________
7. Environment Configuration
- UAT (Testing):
Use the Env.UAT environment for testing. - Production:
Switch to Env.PROD and replace the following parameters before going live:- Merchant ID: Provided by PhonePe for production.
- API Keys: Replace UAT keys with production keys.
Host URL:
https://mercury-t2.phonepe.com
___________________________________________________________________________________________________________________________________________________________________
8. Example Code Snippets
Full Code for Payment and Status Check
from phonepe.sdk.pg.payments.v1.payment_client import PhonePePaymentClient
from phonepe.sdk.pg.env import Env
from phonepe.sdk.pg.payments.v1.models.request.pg_pay_request import PgPayRequest
import uuid
# Initialize the client
merchant_id = “YOUR_MERCHANT_ID”
salt_key = “YOUR_SALT_KEY”
salt_index = 1
env = Env.UAT
phonepe_client = PhonePePaymentClient(
merchant_id=merchant_id, salt_key=salt_key, salt_index=salt_index, env=env
)
# Initiate a transaction
unique_transaction_id = str(uuid.uuid4())[:-2]
ui_redirect_url = “http://127.0.0.1:8080/api/user/subscription/callback/”
s2s_callback_url = “http://127.0.0.1:8000/api/user/payment/webhook/”
amount = 1000
id_assigned_to_user_by_merchant = “15aabbdf-01ce-4b3c-b4e9-8c5574174”
pay_page_request = PgPayRequest.pay_page_pay_request_builder(
merchant_transaction_id=unique_transaction_id,
amount=amount,
merchant_user_id=id_assigned_to_user_by_merchant,
callback_url=s2s_callback_url,
redirect_url=ui_redirect_url,
)
pay_page_response = phonepe_client.pay(pay_page_request)
print(“Pay Page URL:”, pay_page_response.data.instrument_response.redirect_info.url)
# Check transaction status
transaction_status_response = phonepe_client.check_status(
merchant_transaction_id=unique_transaction_id
)
print(“Transaction State:”, transaction_status_response.data.state)
Full Code for Refund
# Refund a transaction
unique_transcation_id = str(uuid.uuid4())[:-2]
original_transaction_id = “TRANSACTION_ID_TO_REFUND”
refund_amount = 100
refund_response = phonepe_client.refund(
merchant_transaction_id=unique_transcation_id,
original_transaction_id=original_transaction_id,
amount=refund_amount,
callback_url=s2s_callback_url,
)
print(“Refund Response:”, refund_response.data)
___________________________________________________________________________________________________________________________________________________________________
This document serves as a comprehensive guide for integrating PhonePe APIs using Python. Ensure to test thoroughly in the UAT environment before moving to production.
___________________________________________________________________________________________________________________________________________________________________
IMPORTANT INSTRUCTIONS (MAY SAVE YOUR TIME)
___________________________________________________________________________________________________________________________________________________________________
Integration Problems Happen when:
- You don’t send ALL THE PARAMETERS and miss any one of them by thinking that is not necessary for any call.
- Making a Small Mistake in preparing the header which consists of SHA256 and some mixed Strings (Don’t forget to match/verify it with online SHA preparation https://www.base64decode.org/).
Must to KNOW:
- SDK is used NORMAL PAYMENTS on scanners only. For SUBSCRIPTIONS, you have to use the CURL APIs.
- Things to remember for the testing:
- UAT Tests will NEVER be logged on the Phone pe console. You will need to test it using the APIs with the subscription & payment IDs. Only production Purchases will be visible on the console.
To test (UAT) payments on the mobile App, you will need to use the demo APK/iOS Build provided by Phone pe which you can find in the documentation(https://developer.phonepe.com/v1/docs/autopay-uat-sandbox).
Steps for Autopay – UPI
Follow the below steps to verify different payment methods on the Custom Checkout page.
- Update the Host URL of the UAT Sandbox:
Host: https://api-preprod.phonepe.com/apis/pg-sandbox
Android/iOS Test App
Download and install the PhonePe Test app to verify the flows in UAT.
- Android – Download from here [Package Name: com.phonepe.simulator]
- iOS – Share the Email ID with the PhonePe Integration Team on the integration thread to send the invite via Firebase.
Test App Setup
- Click on “Settings” and configure the “VPA for Collect” like @ybl that can be used for testing the UPI Collect Flow.
Once the collect request is raised, then click on “Fetch Collect” to see the collect request in the PhonePe Test app and click “Pay” to complete the transaction. - Click on “Test Case Templates” to configure the Success, Failure, or Pending templates to receive the response accordingly.
By default, the Success template will be set and you will always get the Success Response. - Once the Subscription is set up using UPI Intent or Collect flow, then the subscriptions will be visible once you click the “Subscriptions” button. For each Subscription, you will be able to see the option to Pause/UnPause/Revoke.
- Share the Callback/Webhook URL with the Integration team to configure the Static Callback URL for Pause/UnPause/Revoke features.